Perhaps you’ve seen my video on the basics of incorporating flash into your surf photography, if not it’s a good primer for the following discussion on the remote flash shot: http://www.youtube.com/watch?feature=player_embedded&v=kfwnNjxyHqA
Just in case you haven’t read the Behind the Shot feature in issue 220 (November 2012) of Wavelength, the remote flash traditionally involves someone in the water pointing a waterproofed flash at the surfer while the photographer shoots from the beach, his shot lit by the remotely triggered flash.
This sounds a bit complicated and probably quite expensive, indeed the Wavelength feature suggests it could be quite a pain in the wallet and arse to try out.
I am totally new to flash photography but the main reason I got a flash was to try out this style of shot, so if you’re in the same boat head to Part 1 to find out which flash and triggers to get and how to waterproof them, then read on for some of my observations on how to get this shot.
The Pro Gear
Can you see what I’ve done there? photo and technique by Andrew Shield, words by Tim Nunn, if you’re going to try this out I recommend getting a copy of Wavelength issue 220 either via their app or as a back issue, it’s got some great tips for remote flash that I benefited from and more that I look forward to trying out, and the rest of the mag’ is good too.
Here’s what the magazine lays out as the Professionals setup based on Andrew Shield’s shot:
- Lens – the one pictured is a Canon 70-200 f2.8 IS L – about £1800
- Radio triggers for the flash – 2 x Pocket Wizard plus iii (the picture is the plus ii version but they’re no longer listed) – around £220 for two
- Flash – Andrew says that he uses an old Sunpak flash so we’ll go for the Sunpak PZ42X – for about £100
- Housing for the flash and pocket wizard – it’s an SPL flash housing pictured and they don’t publish prices on their website but I found a second hand flash housing (without pocket wizard section) going for $500 in May 2012, so let’s guess at about £600 for the pocket wizard version.
- Some other willing and able person in the water with experience in swimming around in waves who can be relied upon to be in roughly the right place.
So assuming you’ve already got your camera body (the one pictured is the £3500 ish Canon 1D mark iv), memory cards, tripod etc. you’re looking at around £2700 (plus a couple of beers for your mate) to get the pro level set up for this type of shot.
The Budget Options

I did some research (check out strobist for plenty of inspiring ideas on remote flash photography) and assembled the following list of kit for my version of the shot:
- Yongnuo YN460 II flash gun – a cheap flash gun with good reviews coming in at £43
- Yongnuo RF-603 flash triggers – a pair of cheap flash transceivers which also double as a wireless remote shutter release, £27
- Canon 70-200 f4 lens – I picked up the non IS version second hand on ebay for less than £300, it costs £480 new on Amazon
- Waterproofing for your flash – see part one for my DIY housing guide and some off the shelf alternatives.
Meaning I was geared up for a total spend of about £350.
With the kit assembled and tested I needed to get the flash in the water, instead of having to get someone else involved to hold the flash for the proof of concept session I decided to mount it on my board, this would guarantee it was right in the action when the shot was taken and mean one less variable to worry about.
The board mount itself was just an FCS softboard plug with an FCS M5 soft flex with slots cut into it, I slid the handle over the fin, tied it round the bottom of the plug and duct taped it on for extra security, it held up well despite being rolled around a bit.
Then I just needed to get someone out on the water with the rig and try and get the timing right.
Getting the Shot
It turns out talking someone in to surfing with a bulky flash and housing on their board is easier said than done, so I decided to guinea pig the set-up myself.
I had already convinced my fiancée to take on the role of photographer, so using my trusty 9 foot foamie as the weapon of choice we headed to Wembury bay, a local spot where she could get nice and close without getting her feet wet, then I just needed a small swell and a mid-high tide.
We put the camera on a tripod and put it in shutter priority at 1/250 to start with, that’s the fastest shutter speed that will sync with the flash, she had instructions to go slower as it got darker.
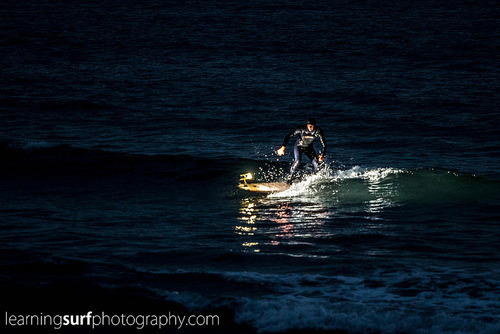
We manually focussed the lens on the line-up and left it at that, I think this was a mistake as the focus is a bit off in most of the shots, I fixed this in the second test session where I got behind the camera and let my friend Joe do some skimboarding.
As you can see the flash wasn’t mounted on his board, instead I had it taped to a sturdy broom handle that I’d hammered into the sand with a rock, it’s just out of shot to the left in this one, set up on three quarter power pointing at one of the likely looking peaks.
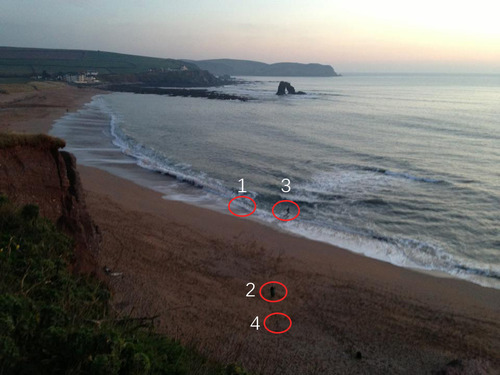
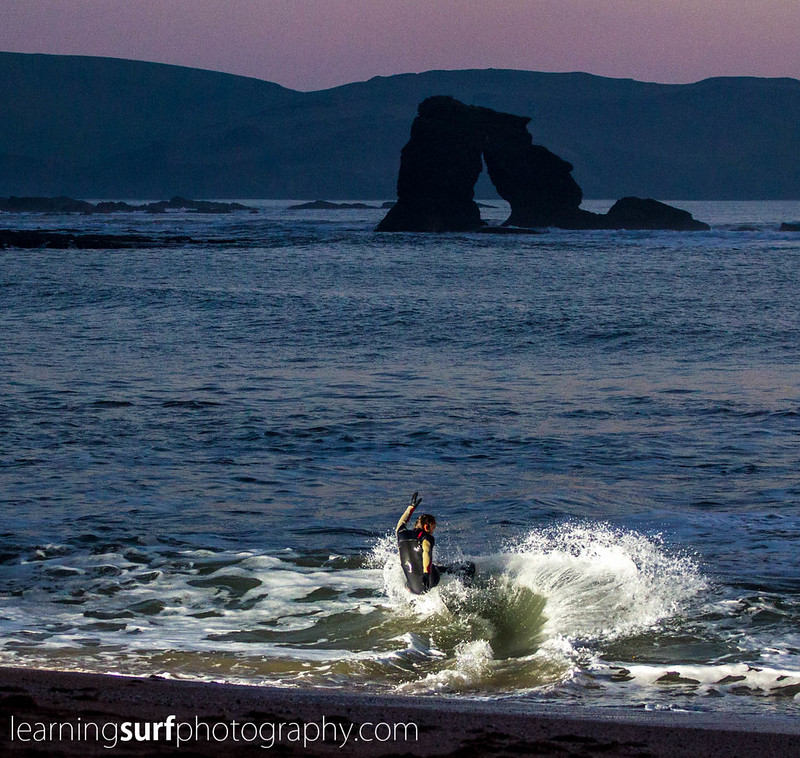
This photo, taken by Ben Freeston from above the beach, shows the flash (1), me (2) and Joe (3), I started off on a tripod (4) but abandoned it as I wanted to get lower to get the nice rock arch in the background and with the flash freezing the action well you don’t need to worry about camera shake.
Camera Settings
Here’s a quick breakdown of my settings for this shot (bear in mind this is the first time I’ve been behind the camera for a remote flash shot so this was trial and error):
- Focus: Manual focus, re-set each time I moved location by picking out a bit of water and slowly focusing until I got focus confirmation beeps in the viewfinder
- Camera Mode: Shutter Priority, it’s dark so the aperture will pretty much be wide open (f4 in this case) in shutter priority, I didn’t see any harm in this as depth of field wasn’t an issue.
- Shutter Speed: 1/250, this is the fastest shutter speed you can use with the flash, I didn’t change it even as it got darker, but next time I will to try and get a bit more ambient light in the shot and to enable me to lower the ISO to prevent creating more noise in the dark areas.
- ISO: auto with maximum of 1600, I tried a couple of test shots with a lower ISO and I will be working on adjusting shutter speed to accomplish this next time as my images are pretty noisy, it’s not too bad as there’s only noise in the dark background but it’s one thing I’ll focus on next time.
- Focal Length: 70-100, although I was using the 70-200mm lens I was pretty close so I didn’t need anything over 100mm, next time I want to experiment with some tight close ups though.
One important thing to remember is that you only get one or two shots with the flash at around three quarter power, the time between waves was pretty erratic so if there wasn’t much re-charge time I would only have one chance, mostly I had two. Either way you have to be very careful not to release the shutter too early, you have to wait for the critical moment and snap two frames.
You have to follow the rider in the viewfinder, wait for the right moment, snap way, then check the photo’s, because the flash is so quick, the camera is flipping the mirror up when it flashes and you’re so far away, there’s no way of knowing if it’s gone off or not until you review the pictures.
I’ve heard that some wedding photographers keep both eyes open when looking through the viewfinder in case something interesting is happening in the periphery, I haven’t mastered this skill and almost blew a couple of shots trying it out so I’d say the blind faith tactic is safest for the amateur.
Conclusion
Now I’m ready to get some proper shots of real surfing/bodyboarding/skimboarding, I just need to convince someone that they really need a new Facebook profile picture and get them to pull into some shorey barrels in the dark or take turns with the flash housing in the sea.
The next obvious step was to get the radio transmitter in my housing somehow and be in the water when the flash is triggered, I have done this a couple of times now and Part 3 will feature a detailed guide on how you can do it too.
In general I have had great fun with the cheap triggers and flash and I expect I’ll be using them a lot in the future, I’ve already got a few ideas up my sleeve and I will no doubt be investing in more flashes as I get into it.
I’d recommend trying this out to anyone who’s remotely interested in flash photography or even if you just want to try something new, for not a great deal of money and time you can add a whole new dimension to evening photo shoots.
Leave a Reply